Tag Archives: Technical

Outlines (Includes shader)

Shader download link. Read at the end of the post for instructions.

Screen12M11The visual highlighting system has been an ongoing challenge throughout the development of Software Inc. It seems very simple on the surface, and in the end it was, but I had to read up on shaders to finally land on a working solution.

The main problem was showing highlighted objects through other objects. Initially I used a modified version of the cartoon outline shader that comes with the Unity standard image effects asset. It doesn’t show through objects, but it creates a nice outline by offsetting vertices out from their normals and using front face culling. This has discontinuity problems with flat faces, since the edges will break off when offset, but it’s not really that noticeable.

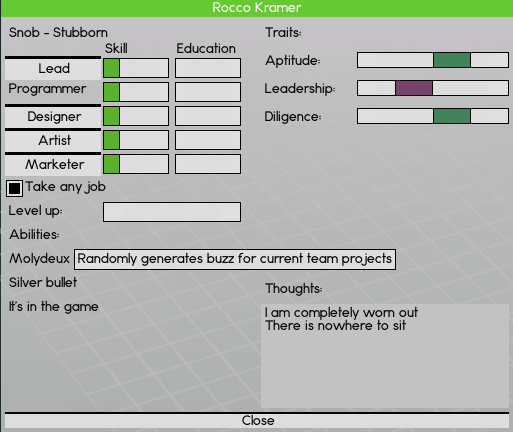
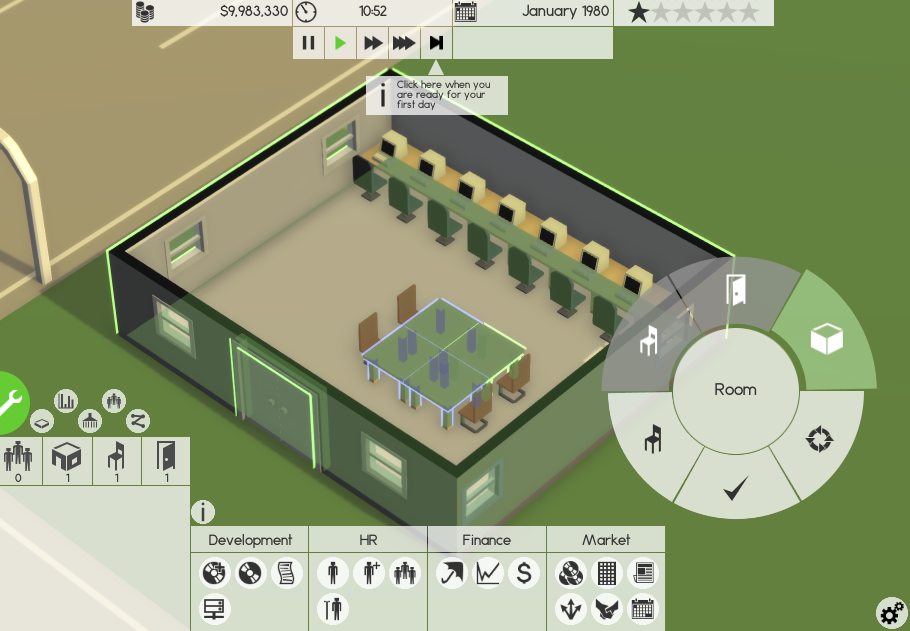
In alpha 6, I decided that selected objects needed to be visible, because I often found myself confused by what furniture I had selected, when I changed floor. I went with the easy solution of just rendering the same mesh at half opacity with depth testing set to greater, so it only renders when something is in front of it. All in the same shader as the outline. However, it still looks confusing as you can see below. You can see how the floor of the room renders green through the tables.

Screen4M11

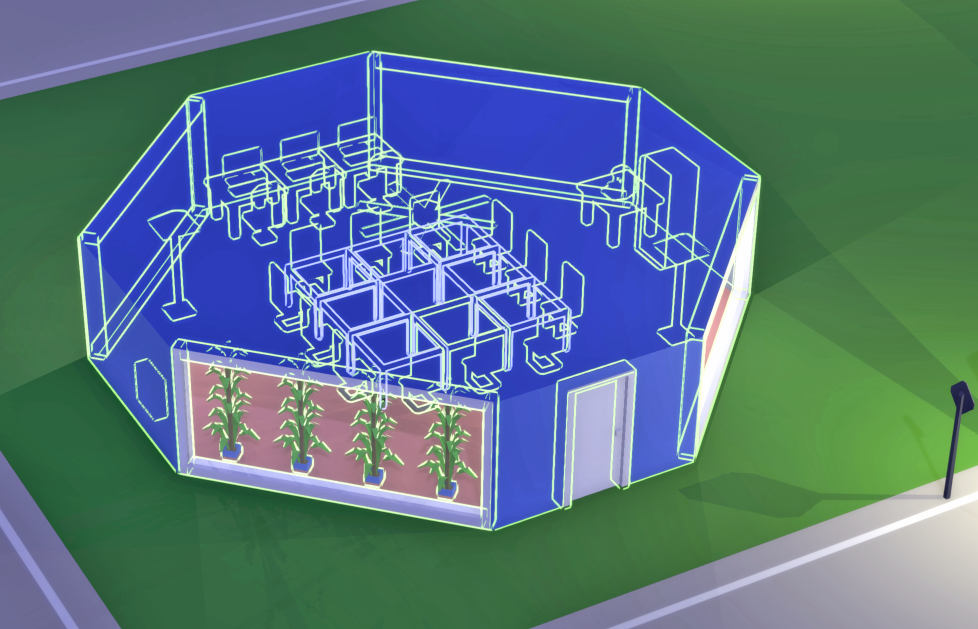
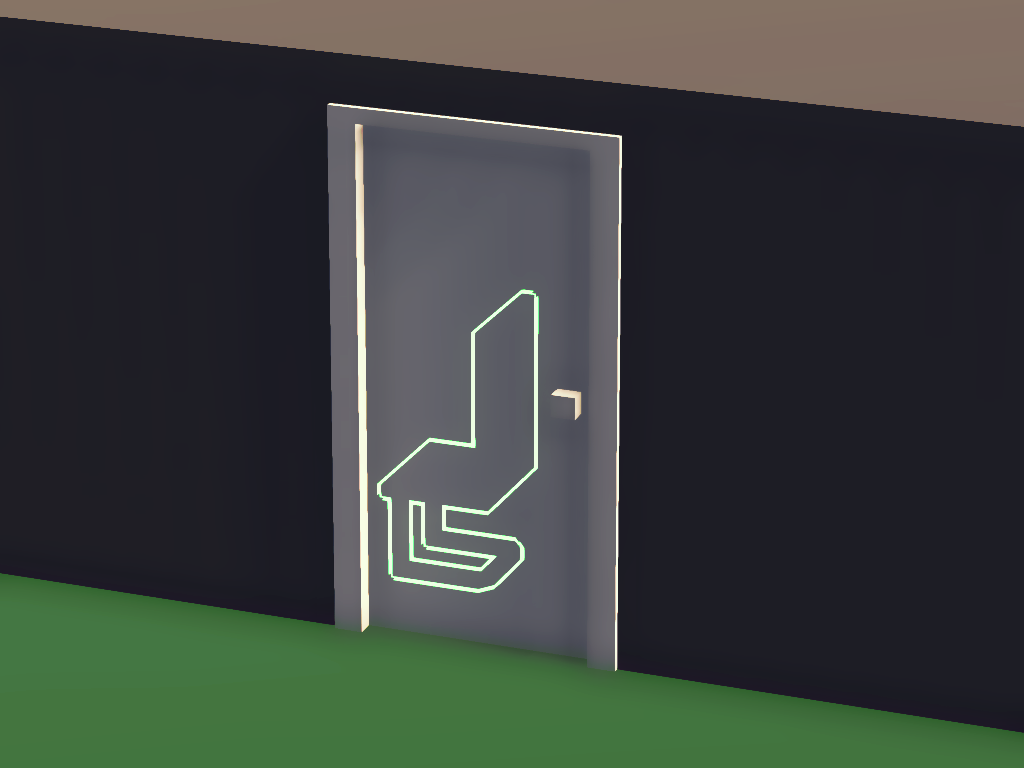
The final solution required using the stencil buffer, which I hadn’t used before. I couldn’t easily draw the outline on top of everything otherwise, since it would require only depth testing each object with itself. Basically you render the entire mesh including outline to the stencil buffer, without actually drawing anything on screen. Then you remove the mesh itself from the stencil buffer by rendering only the mesh. Finally, you render the result of the two stencil passes without depth testing, so it appears above everything else. This is done per mesh, so they are drawn independently of each other, meaning there is no over-shadowing and no post processing involved, like blurring to increase the outline width.

Highlights

Actually putting it to use is a whole other story, but basically each mesh I want to highlight has a highlight tag and when it is highlighted an extra shared material get’s added to its MeshRenderer, which uses the outline shader. Each object which can be highlighted inherits from a Selectable class, which in turn inherits from GameObject. A SelectorController class keeps track of highlighted Selectables and tells them if they need to traverse their transform hierarchies to add the highlight material to the highlight tagged meshes.

So to use the shader, simply add a material with the shader to the MeshRenderer of the object you want to highlight, on top of the material(s) it already uses.

Tenth update – New character model (again again again again)

Screen17M4

I started with a sphere, I then downloaded a model from here to test animation, I then made my own to avoid copyright issues. I hated it, so my wife drew some concept art for a new one, which I screwed up modellin. I’ve just modeled the latest one, to the right in the picture above.

It will most likely get replaced again, if I can afford it, but the important thing is the underlying system.

Screen12M4

The plan with character customization in Software Inc. has always been to have a simple model and change the textures. This has worked pretty badly, especially for hair, I ended up having a mesh for each gender, and the female mesh had hair and skirt permanently attached. But reading an update from Parkitect, I got inspired. I wanted to try implementing the same system, i.e. separate meshes for the lower part, the top part and the head.

Screen10M4

I started testing how to control two meshes using one skeleton. I made one parent skeleton, containing all animations, but no polygons. Each mesh I added to the final mesh then made its bones children of the parent skeleton’s equivalent bones, forcing them to animate. This worked perfectly. And the script is simple: Foreach of my bones, set the parent transformation to a bone in the parent skeleton, which has the same name, and reset position and orientation. It is very important to always use the same base skeleton when rigging each sub-part though, the transformations need to be identical.

Screen13M4

After some trial and error, I figured the best way to go about this, was to have a base human mesh, which is unisex, and then stick clothes to its skeleton. This works really well, as you can see in the first draft, in the picture above. (Please disregard the fact that I am obviously an amateur 3D-modeler)

Screen14M4

I then proceeded to rewrite all customization code. It wasn’t that hard, since after adding the “add clothes mesh to my skeleton” functionality, I just had to replace “Texture” with “Mesh” here and there. Sadly, the previous model has now been replaced, just as the demo has been released (you can try the demo here), so it never really saw the light of day.

Screen15M4

You can see a comparison of an old screenshot of the customization screen and then recreated with the new model in the picture above.

Eighth Update – Personalities

I’ve just finished implementing the personality system in Software Inc! The personality system is a graph of personality traits, describing their relationship with each other and their attributes. Each employee in the game gets two personality traits.

The graph is of course moddable, so you can add traits and decide their attributes and relations.

Screen7M4

I’ve illustrated a tiny piece of the current graph in the image above. The circles are personality traits, the color of the arrows between them indicate how they regard each other, the colors of the rows in table next to the circles illustrate how a trait influences the employee and the color of the circles indicate their compatibility.

As an example, say you have the mean trait, then you will have aptitude, bad leadership skills and average diligence. Being mean also makes you dislike people who are generous and optimistic, and feel indifferent towards people who are pessimistic. Finally, if you are mean you can also be pessimistic or optimistic, but you can’t also be generous, since the mean circle isn’t blue or green. Note that this is not necessarily how it works in the real world, but the point is to give the player an intuitive sense of an employee based on her personality traits and these relationships are subject to change.

Screen6M4
This is how the employee detail screen currently looks. The personality traits are written in the top left corner.

So what difference does having personality traits make? When you put an employee on a team, her traits will be weighted against the other members of the team, determining how well she works together with the other members. If she dislikes a person on her team she might get angry and want to quit. Overall bad team compatibility will have an effect on your employees’ work quality, but a good team leader can alleviate the problem.

So what does aptitude, leadership and diligence mean? Well, each personality trait changes the characteristics of its employee, which affects their stats and behavior in the game. Currently aptitude, leadership and diligence are the only three characteristics, but the system allows me to expand these at any point, although they are not moddable. Aptitude controls how quickly an employee gains skills and education, leadership controls how well a leader does his job(research, employee satisfaction, etc.) and diligence controls how late an employee is and how often the employee calls in sick.

Development Progress So Far

Screen1M4

So this is how progress looks so far on Software Inc. There are huge spikes and rapid drops. The big spike in the beginning was due to a week where I had no obligations, it makes me wonder how quickly I would be able to finish this game if this was a full-time job. Probably less than a year, I’m sure.

I had a quick trip to Italy with my wife and didn’t bring a laptop with me, so that explains the first drop. Currently, I’m earning my bachelor degree in Computer Science and I will be done around May next year. I also work a part-time job at a pension company, but my job has had little to no impact on the amount of work I can get done, but my classes are draining me completely. I only have a couple of courses left and my thesis, but I’m just not motivated to finish it. It feels like I’ve finished all the interesting courses and now I’m just doing it to have something on my resume. So work on Software Inc. will be a little slow for the next six months, in between holidays. I’ll scramble to get it polished before the demo I have planned this month.

Screen2M4

Here is one thing that surprised me, though; during the current slow period the average amount of work I complete on Wednesdays has kept pretty steady compared to the other days. On Wednesdays I have 4 hours of waiting for the next class to begin, so I sit in a canteen and try to get a little work done on Software Inc. and it has proved extremely valuable. Which just goes to show that a little work on a regular basis can have a huge impact, although it doesn’t feel as significant as the big sprints, but the sprints have probably helped in keeping the Wednesday-average high to begin with.

Sixth update – Progress

36Screen
The main menu

I’ve been gaining a lot of motivation from using Trello and my Changelog script, which has culminated in finally creating the dreaded “Main Menu”, albeit with missing menu items. In the ~13 years I’ve been programming, I’ve created maybe 3 main menus. Needless to say, I consider this a great success.

Making a point system for my tasklist on Trello (easy=1, medium=2, hard=3) and automating the report has helped immensely. I’m now somewhat able to quantify my progress and it feels extremely satisfying putting tasks in the done list. It feels like a game. It has the added bonus of giving me a more precise way of predicting milestones, by comparing how many points I’m getting per week and comparing with how many point are left.

Here’s the PHP script that generates the changelog. It requires labels named ‘Easy’, ‘Medium’ and ‘Hard’ and your cards should all be labeled. It also requires a list in which you put all the cards/tasks that are done.

$key = "Your Trello API key";
$listID = "The ID of your done list";
$data =file_get_contents("https://api.trello.com/1/lists/$listID/cards?actions=updateCard&fields=name,url,labels&key=$key");
$json = json_decode($data);
$cards = array();
foreach ($json as $card)
  {
  foreach ($card--->actions as $action)
    {
    if (isset($action->data->listAfter) && $action->data->listAfter->id==$listID)
      {
      $cards[] = (object) Array(
      'name'=>$card->name,
      'labels'=>$card->labels,
      'dateLastActivity'=>$action->date,
      'url'=>$card->url
      );
      }
    }
  }
$grouped = array();
$points = array();
$labelpoints = array(
  'Easy'=>1,
  'Medium'=>2,
  'Hard'=>3,
);
$fontsizes = array(
  'Easy'=>'75%',
  'Medium'=>'100%',
  'Hard'=>'150%',
);
$fontcolors = array(
  'Easy'=>'#00DD00',
  'Medium'=>'#DDAA00',
  'Hard'=>'#DD0000',
);
foreach ($cards as $card)
  {
  $date = new DateTime($card->dateLastActivity);
  $id = $date->format("\W\\e\\e\k W, Y");
  $day = $date->format("l");
  $grouped[$id][$day][] = $card;
  $points[$id][$day][] = count($card->labels>0)?$labelpoints[$card->labels[0]->name]:0;
  }
krsort($grouped);
foreach ($grouped as $date => $day)
  {
  $point = array_sum(array_map(function ($x) {return array_sum($x);},$points[$date]));
  echo "

<h2>$date ($point)</h2>

<ul>";
  foreach ($day as $dd =&gt; $group)
    {
    $point = array_sum($points[$date][$dd]);
    echo "

   <li>$dd ($point)</li>

<ul>";
    foreach ($group as $card)
      {
      $size = count($card-&gt;labels&gt;0)?$fontsizes[$card-&gt;labels[0]-&gt;name]:'100%';
      $color = count($card-&gt;labels&gt;0)?$fontcolors[$card-&gt;labels[0]-&gt;name]:'black';
      echo "

   <li><a style="font-size:$size;color:$color;" href="$card->url">$card-&gt;name</a></li>

";
      }
    echo "</ul>

";
    }
    echo "</ul>

";
  }

The sound of flushing a toilet

Free SFX goodness at the end of this post!

AudioHack
The audio listener is tied to a focal point near the ground, instead of directly to the camera.

This week I decided to work a bit on the audio to make this trailer for shits and giggles.

9 years ago I started making rap music (pretty typical gamedev hobby) and I got pretty okay at composing, mixing and recording and stuff like that. I also spend an ass-ton of money on recording equipment, software and instruments and about 4 years ago I stopped, because of just life happening. So to avoid having wasted a lot of money and time I’ll be recording all sound effects and compose all music for Software Inc. You can listen to stuff I made some years ago on Myspace.

For now, I recorded water boiling for the coffee machine, a refrigerator opening and closing, myself saying “bla bla bla”(not included in download) for meetings, punching on the keyboard, pouring water down a toilet and flushing, and my computer fan.

I had a problem adding the sound effects to the game though, since the only way to really hear them clearly was to position the camera directly above what you wanted to hear, and it seemed pretty unnatural. So I decided to move the listener away from the camera and down to the ground, to where the camera is focusing.

Normally, when I want to do RTS like camera movements, I add an empty focal object on the ground and add the camera as its child transform, pointing towards the focal object. When I want to move the camera around I just move the focal object on the ground. Rotation works by rotating the focal object, so the camera rotates with it, always pointing towards the focal point. Zooming is just moving the camera closer on the local z axis. So, my audio listener hack only required me to add the audio listener as a child transform of my focal object.

Anyway, I wanted to share my sound effects with you, since they were pretty easy to make, but required a lot of expensive gear you might not have. You are free to modify the files and use them any way you want, and you don’t even have to give me credit or anything like that. CC0 license.

Download here

The download is a 400 KB zip file containing 10 .ogg files.

How not to handle saving games

I’m a bit wary of serialization in Unity3D. I’m pretty sure everything is gonna break if I just go ahead and serialize everything in one go. I’ve tried using plugins, but they are usually chunky, slow and rarely work. Since I want to release Software Inc. as an early access game, save games need to be backwards compatible, so I decided to roll my own serialization, partly using the BinaryFormatter that comes with Mono/.Net. I’m still not sure whether the save games should be plain-text; if people want to edit save games, they are gonna find a way to do it, anyway.

I wrote a custom dictionary class that returns null if the key is non-existent, so that I can handle missing values from older save games. This can be done with the normal Dictionary<TKey, TValue>, but this makes the code easier on the eyes. Basically you just overwrite the indexer for the class using the syntax:

public TValue this[TKey key] {get; set;}

I then added an abstract class, Writeable, which has methods to serialize and deserialize an object into my dictionary class. It also marks each object it deserializes with a global ID, so that other objects referring to it can find it again. I then use this class to serialize everything that has anything to do with the MonoBehavior class, everything else can be handled by the build-in BinaryFormatter. It’s worth noting that I needed to implement a class to cast to and from Vector3/Quaternion/Color, since these are not serializable by default, luckily they are just a collection of floats.

Finally, I put all my dictionaries in a list and serialize it, while carefully keeping track of the order in which everything is put in the list. Done. Now my code looks like crap, but it works.

Randomization = Super Sausage Corp.

This week, wanting to mix things up, I decided to focus on some superficial random generation. Always fun! So I worked on a random name generator, that I will be using to generate company and product names for the competitors in Software Inc. and an employee generator, which basically means I colorize and combine faces/hair/jackets/pants in to one texture, so that each employee looks a little unique.

Employee generator

25Screen
So creepy…

The employee style generator, or creepy-on-the-fly generator,  is basically a quick shader I wrote for Unity (which can be downloaded here) which starts with a base color, which is the skin color, and then adds layers on top of the base color, each layer being colorized individually. Specifically, the layers I add are textures for the face, hair, jacket (or blouse or what have you) and pants, and each of them has an alpha channel, so that they don’t overwrite the previous layer. I then have a class which keeps track of all the textures for each group and assigns them randomly.

The texture class also has Gradients for the skin, hair, jacket and pants to determine which colors can be used to colorize the textures and, effectively, which colors are more likely, by how much space they take up in the gradient. Gradients in Unity are extremely cool and allow you to visually edit color gradients to use directly in your scripts, I really recommend that you try them out!

The generator is far from finished. If I get someone competent to model the employee, I hope to use BlendShapes to morph the model between skinny/obese and woman/man. Currently, there are only male looks, not because I’m being sexist, but female hair is just harder to model and texture.

Name generator

Names
Screw Coredumping, Super Sausage Corp. sounds way better!

My random name generator uses a tree like structure to generate random strings of words. A generator can be loaded from a file with a very simple structure, eg.

-start(base)
-base(base2,end,stop)
Hello
Hi
-base2(end,stop)
, you
-end(stop)
.

Will create a generator that can generate the strings:

Hello
Hi
Hello.
Hi.
Hello, you
Hi, you
Hello, you.
Hi, you.

It works by starting from the first node start (nodes are the ones with a hyphen in front of the name), it appends a random string from the list of strings below it (in this case there’s nothing to pick), it then picks a random node from the parenthesis of the current node (which can only be base in this case), and then it continues until it reaches the node stop.

I then have a generator for each type of software and for the companies. It’s a very simple algorithm, and as you can see in the picture above, the results can be pretty dumb, in a good way. The source can be downloaded here.

Behavior trees

03Screen
The initial behavior tree for employees. “Work” consists of staring at a screen until “GoHome”.

For Software Inc. I decided to learn a bit about implementing AI, so I read a couple of paragraphs, got impatient and started coding stuff, because I am not smart and, apparently, I like messing things up I could’ve otherwise avoided by just studying a bit.

Normally when I implement AI I end up with a 1000 lines of IF-THEN-ELSE and switch case statements. Behavior trees seemed like a cool alternative, so I went looking for implementations, because when it comes to programming, NEVER reinvent the wheel, so after seeing something to the tune of “200$”, I decided to reinvent the wheel… Poorly… And share it with you, of course, for free(Requires .NET 4.5, only works with C# files, simply select a cs file and the program will generate two new partial classes, one of which (class.impl.cs) contains the methods you need to fill in. It will not overwrite previous state methods when you export on top of it. BACKUP BEFORE USING).

So I made a small application in which I can visually draw states and connect them, and when I am done, I simply choose a C# file with my class in and it will generate all the method stubs and the code to generate the behavior tree, as seen in the picture below.

04Screen
Example of the code generated to construct the behavior tree seen earlier.
09Screen
How the behavior tree looks now. Notice “WantCoffee”, this game is going to be so stereotyped. I don’t even drink coffee…